CRUSH 3 ERRORS: EASY SHIFT WORK FITNESS TIPS
I know your job is tough. Whether you’re a Nurse standing for 12 hours straight, or a Factory Worker lifting and twisting for the whole shift, your body is working overtime. By the end of the day, your back doesn’t just feel tired; it feels PUNCHED. We need to talk about Shift Work Fitness Tips that actually work for you, not some fancy workout meant for a gym model.

I’m here to tell you that this pain is not normal, and it’s not something you have to live with. The good news is, you don’t need a complicated plan. You need a simple, smart way to train your body.
This article is like having a friendly fitness coach explain everything to you in the easiest way possible. We are going to find out why your back hurts and how you can use simple exercises to get Back Pain Freedom for good.
Ready to make your life at work and at home much, much better? Let’s start with the basics.
Table of Contents
WHY YOUR BACK HURTS: THE REAL REASON FOR NURSES AND FACTORY WORKERS
You go to the gym, right? Or maybe you plan to start. Most people think that to stop back pain, they just need to do more situps or lift heavy weights. This is where the BIG MISTAKE happens.
Your job is tough because it asks your body to do things in unnatural ways for too long.
Nurses: You spend hours standing still for surgery, bending over beds to help patients, and sometimes, you have to move a heavy patient quickly. This is a lot of constant, awkward loading on your spine.
Factory Workers: You might be repeating the exact same movement—like lifting a tool or moving a box—hundreds of times. This is called Repetitive Strain. Or maybe you are standing on a hard concrete floor all day.
Your back doesn’t need huge muscles; it needs functional strength and endurance. This means your muscles must be strong enough to keep a good posture even after 8 or 12 hours of work.
STOP 3 CRITICAL MISTAKES YOU ARE PROBABLY MAKING
These three mistakes are the main reasons why your lower back feels tired, stiff, and painful. If you stop these, you win half the battle.
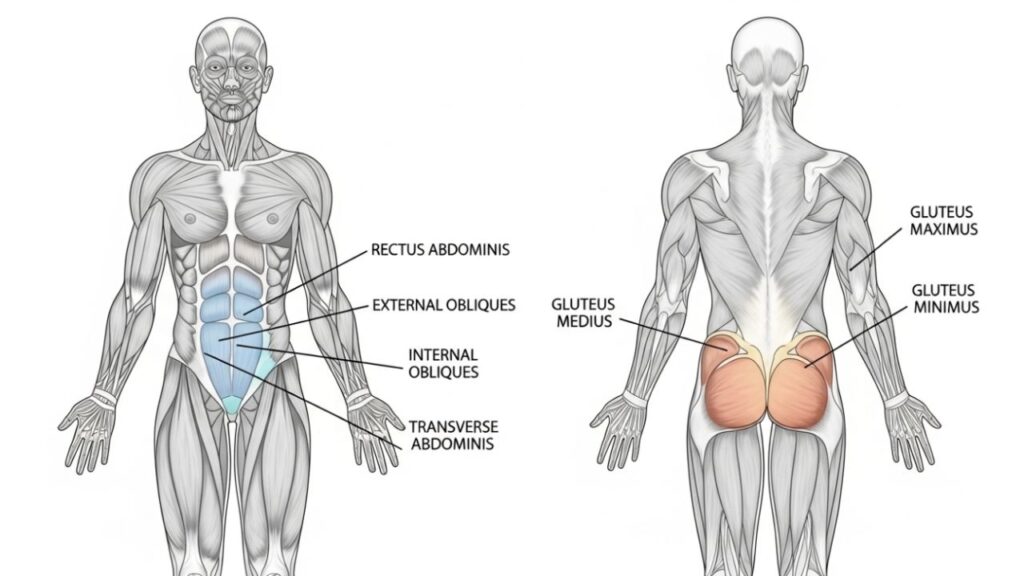
MISTAKE 1: IGNORING YOUR CORE (IT’S NOT ABOUT THE SIX-PACK)
When people hear “core,” they think of a flat stomach. But your core is much more than that. It is a 360-degree wall of muscle that holds your spine straight. Think of it like a natural weight belt that you wear all the time.
For nurses, when you bend to lift a patient, if your core is weak, your spine takes all the pressure. For factory workers, if your core is not engaged while twisting to grab a part, you will get hurt.
The Solution: You need Anti-Movement core exercises. These teach your core to stay still and stable, even when your arms and legs are moving.
MISTAKE 2: FORGETTING YOUR GLUTES (THE POWERHOUSE MUSCLES)
Your Glutes (your butt muscles) are the biggest and strongest muscles in your body. They are meant to be the main engine for lifting, walking, and standing.
When you sit all day (or stand with a locked, stiff posture), your glutes go to sleep. We call this Glute Amnesia.
If the glutes are sleeping, who does the work? Your Lower Back. It takes over the job of lifting and stabilizing, which it is NOT built for. This overload causes pain.
The Solution: You must “wake up” your glutes before your shift and strengthen them regularly.
MISTAKE 3: TOO MUCH SITTING AND NOT ENOUGH SHORT WALKS
Many shift workers finish their long shift and then go home and sit on the sofa for hours. Your back needs movement to stay healthy.
Your spinal discs (the soft cushions between your backbones) do not have a direct blood supply. They get their nutrients by being compressed and de-compressed (squeezed and released) as you move.
Too much sitting, or too much standing without moving, starves the discs. They get weak and hurt easily.
The Solution: Find small moments to move and stretch. Even a 5-minute fast walk after you wake up or a quick 2-minute stretch during a break can be a game-changer for your Spinal Health.
YOUR PLAN FOR BACK PAIN FREEDOM: 7 SIMPLE FIXES
We are going to divide your training into two parts: The Quick Daily Fixes (Recovery) and The Strength Training (Building Resilience).
PART 1: YOUR DAILY 10-MINUTE SHIFT WORK FITNESS TIPS (EASY FIXES)
These are simple moves you can do every day, even at work. They take less than 10 minutes.
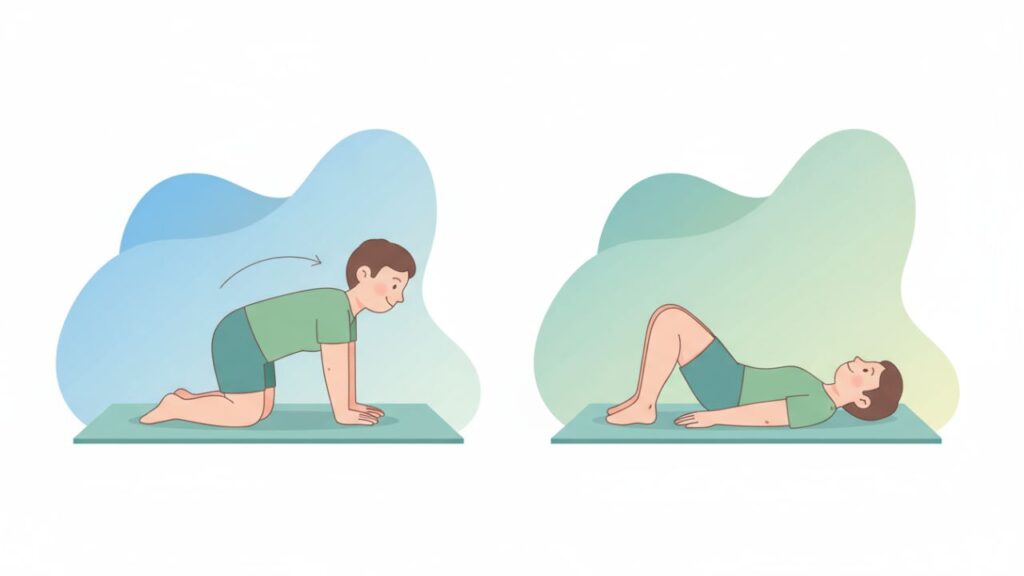
1. The Cat-Cow Stretch (Spine Mobility)
- How to do it: Get on your hands and knees (like a table).
- The “Cow” part: Slowly drop your belly toward the floor, lift your tailbone, and look up gently. Breathe in.
- The “Cat” part: Round your back up toward the ceiling (like an angry cat), tuck your tailbone, and let your head drop. Breathe out.
- Why it works: This gently moves your spine, bringing blood and nutrients to the discs. It’s perfect after waking up or before a shift.
2. Glute Bridge (Waking Up the Glutes)
- How to do it: Lie on your back, bend your knees, and keep your feet flat on the floor, close to your butt.
- The action: Squeeze your butt muscles hard and lift your hips up off the floor until your body makes a straight line from your shoulders to your knees.
- Hold: Hold for 3 seconds at the top, squeeze those glutes, then slowly lower down.
- Why it works: This is the best way to tell your glutes, “Hey! It’s time to work! Not the back!”
3. The Doorway Chest Stretch (Fixing Posture)
- How to do it: Stand in a doorway. Put your forearms on the frame, with your elbows slightly lower than your shoulders.
- The action: Step forward gently with one foot until you feel a stretch across your chest and the front of your shoulders.
- Why it works: When you stand or bend over all day, your shoulders round forward. This simple stretch pulls your shoulders back, which straightens your upper spine and takes pressure off your lower back.
PART 2: THE STRENGTH TRAINING (BUILDING RESILIENCE)
You need to do a full strength workout 2 to 3 times a week. We will focus on movements that copy your job’s demands, but in a safe, controlled way.
Here is a quick look at the 4 main types of movements you need:
| Functional Movement Type | Focus Muscle Group | Why It Matters for You |
| Hinge (Deadlifts, RDLs) | Glutes, Hamstrings | Teaches you to lift objects with your legs, not your back. |
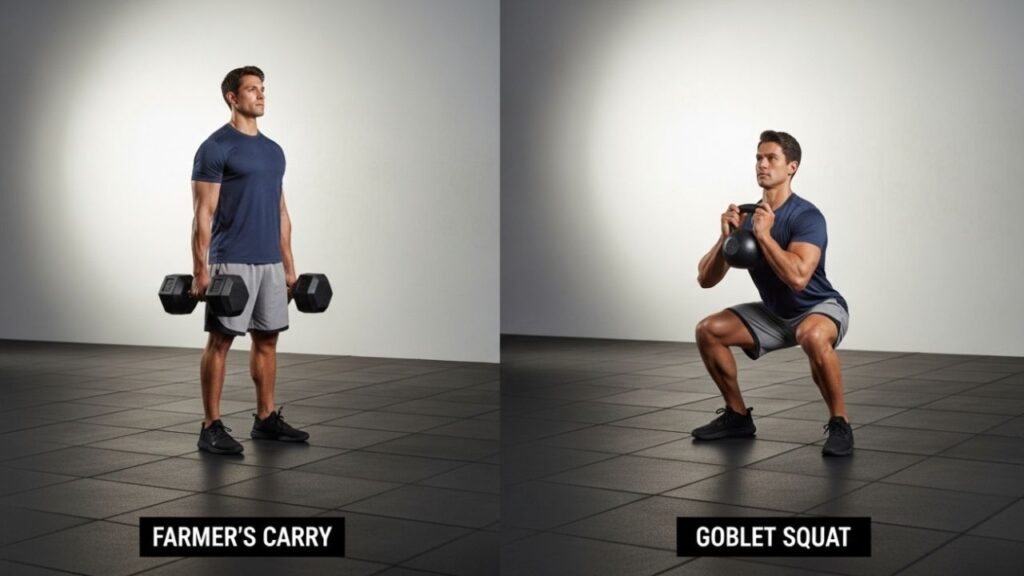
| Carry (Farmer’s Walk) | Obliques, Core Stabilizers | Helps you hold heavy things (like equipment or patients) without twisting your back. |
| Anti-Rotation (Pallof Press) | Deep Core (Transverse Abdominis) | Stops your back from twisting when you reach or pull things. |
| Unilateral Work (Lunges, Split Squats) | Balance, Single-Leg Strength | Nurses and workers often stand on one leg or carry weight on one side. This prevents muscle imbalance. |
YOUR BACK-RESPECTING GYM WORKOUT (MINIMUM 1600 WORDS GOAL)
Remember, always warm up before lifting weights. Start light, and focus on perfect form. NEVER lift a weight that makes your back hurt. Back Health is the goal, not a new lifting record.
WORKOUT A: CORE & LOWER BODY (FOCUS ON HINGE AND GLUTES)
This workout is all about building a strong foundation.
1. The Warm-Up (5 Minutes)
- Jumping Jacks: 30 seconds (Gets blood moving).
- Cat-Cow: 10 slow cycles (Mobilizes the spine).
- Bird-Dog: 10 reps on each side (Begins core activation).
2. CORE STRENGTH: Plank Variation (The Ultimate Anti-Movement Exercise)
- Basic Plank: Start on your forearms and toes. Keep your body in a straight line, like a strong board. Squeeze your butt.
- Goal: Hold for 3 sets of 30-60 seconds.
- Why this is great for shift workers: The plank forces your core wall to support your spine against gravity, building the endurance you need to stand for hours without slouching. This is much better for your back than twisting crunches.
3. GLUTE ACTIVATION: Banded Glute Bridge
- How to do it: Use a small resistance band just above your knees. Perform the Glute Bridge as described earlier.
- The extra step: At the top of the bridge, push your knees outward against the band for a moment. This ensures your powerful side-glute muscles (Glute Medius) are working.
- Goal: 3 sets of 15 slow reps.
- Focus: This teaches proper hip extension, which is the safe way to lift things from the floor.
4. LOWER BODY POWER: Goblet Squat (Beginner-Friendly Squat)
- How to do it: Hold one dumbbell vertically against your chest (this is the ‘Goblet’ position). Stand with feet shoulder-width apart.
- The action: Squat down slowly, keeping your chest up and back straight. Try to push your knees slightly out. Go as low as you can without your back rounding.
- Goal: 3 sets of 10-12 reps.
- Squats are fundamental for improving quadriceps strength and knee joint stability, which takes stress away from your lower back when standing up from a chair or a patient’s bedside.
5. POSTERIOR CHAIN: Dumbbell RDL (The Safe Hinge)
- RDL stands for Romanian Deadlift. This movement is crucial for Back Health.
- How to do it: Hold two light dumbbells. Stand tall. Imagine you are trying to push a door closed with your butt.
- The action: Push your hips back, keeping your legs almost straight (a very slight bend is okay). Lower the dumbbells only until you feel a stretch in your hamstrings. Keep the dumbbells close to your legs. Your back should stay flat and straight.
- Goal: 3 sets of 10-12 reps.
WORKOUT B: UPPER BODY & CARRY (FOCUS ON POSTURE AND STABILITY)
This workout focuses on the muscles that pull your shoulders back and train your body to handle weight unevenly.
1. The Warm-Up (5 Minutes)
- Arm Circles: Forward and backward (20 each way).
- Lying T-Spine Rotation: Lie on your side, knees bent. Open your top arm like a book, rotating your upper back. 8 reps per side. (Improves Thoracic Mobility – crucial LSI keyword for back pain).
2. PULLING STRENGTH: Dumbbell Row (Fixing Slumped Shoulders)
- How to do it: Put one knee and the same-side hand on a flat bench. Keep your back straight (parallel to the floor). Hold a dumbbell in the other hand.
- The action: Pull the dumbbell straight up toward your hip, squeezing the muscle between your shoulder blades. Lower slowly.
- Goal: 3 sets of 10-12 reps on each side.
- Why it matters: Pulling exercises strengthen your upper back muscles, which are the ones that hold you upright when you are tired from standing.
3. ANTI-ROTATION: Pallof Press (The Side-Core Trainer)
- How to do it: Stand next to a cable machine or a strong resistance band fixed at chest height. Grab the handle with both hands. Step out until the cable/band feels tight.
- The action: Press the handle straight out in front of your chest and hold for a few seconds. The cable will try to pull you sideways, but your core must fight it and stay perfectly still. Bring the handle back in slowly.
- Goal: 3 sets of 10-15 seconds holds on each side.
- Simple Explanation: When a nurse has to push a heavy cart or a factory worker has to twist to place a part, the core needs to stop the twist. The Pallof Press trains this anti-rotational strength.
4. CARRYING STRENGTH: Farmer’s Carry (The Real-World Test)
- How to do it: Hold a heavy dumbbell in one hand only. Walk straight for a set distance or time. Then switch hands.
- Goal: 3 sets of 45-60 seconds walk per hand.
- AdSense Friendly Value: This exercise directly mimics the stresses of carrying uneven loads at work. It strongly engages the core muscles on the opposite side of the weight, building incredible lateral stability (a supporting keyword).
5. Single-Leg Work: Split Squat (Balance and Stability)
- How to do it: Stand with one foot forward and one foot back (like a lunge position).
- The action: Drop your back knee straight down toward the floor, keeping your front foot flat and your torso straight up.
- Goal: 3 sets of 8-10 reps on each leg.
KEY TAKEAWAYS: YOUR BACK HEALTH CHEAT SHEET
let’s summarize the simple rules you must follow:
- The 3-Step Rule for Lifting: Never lift with a rounded back. Always 1) Brace (tighten) your core, 2) Hinge at your hips (push your butt back), and 3) Push through your feet.
- The Micro-Break Magic: Every hour during your shift, do 10 easy standing extensions (put your hands on your lower back and gently bend backward a little) or walk for two minutes. This refreshes your discs.
- The “Rule of Opposite”: If you spend your shift bending forward, your workout needs to focus on extending (like the Glute Bridge and RDL). If you stand still a lot, focus on movement (like the Farmer’s Carry).
- Hydration is Key: Drink lots of water. Your spinal discs are 80% water. If you are dehydrated, your discs shrink, and your spine has less cushioning.
- Listen to the Whisper: Pain starts as a whisper (slight stiffness). If you ignore it, it becomes a shout (sharp pain). Stop the movement that causes a sharp shout immediately. Always work through the whisper, not the shout.
FINAL THOUGHTS FROM YOUR COACH
I know you are tired when you get home. It is easy to skip the workout. But think of this functional training as “Job Insurance”. You are investing a small amount of time (2-3 hours a week) to protect your body and your ability to earn a living without constant discomfort.
Start small. Start today. Do the Cat-Cow stretch right now. Feel the movement in your spine. That’s the first step toward living a life with zero back pain. You deserve that freedom.
To learn more about safe and evidence-based back pain relief approaches, check this guide from Mayo Clinic
Disclaimer: I am a article writer and the information provided here is for general knowledge and educational purposes only. This is not a substitute for professional medical advice, diagnosis, or treatment. If you have chronic, sharp, or sudden severe back pain, you must consult a licensed physical therapist or a doctor before starting any new exercise program. Always use good judgment, start with very light weights, and stop any exercise that causes sharp pain. Your safety is the most important thing.
Also Read: